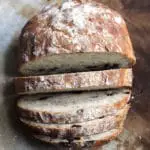
This artisinal Gluten-Free Cheese Olive Bread has a wonderful crumb and holds up beautifully! Gluten-free and vegan bread has never tasted this good!
- 230 grams My Best Gluten-Free Bread Flour mix, plus more for dusting - see note for link, no substitutions*
- 1 1/2 tsp Instant Yeast
- 1 tbsp Sugar
- 1 tsp Salt
- 210 grams Water (1 1/2 tbsp short of 1 cup)
- 1 1/2 tbsp Olive Oil
- 1/2 cup Shredded Vegan Cheese, I used Daiya Mozza
- 1/3 cup Black Olives, chopped
- 2 tsp Mediterranean herb blend, optional (sub with any herb mix you like)
-
Whisk together the flour, yeast, sugar, and salt in a large mixing bowl.
-
Combine the water and oil in a measuring up.
-
Using a stand mixer with the dough attachment, or a hand mixer with the dough attachments, slowly incorporate the liquid with the dry ingredients at a slow speed.** After you have added all the liquid, beat the dough for a full 5 minutes. You will notice the texture of the dough change. This step is very important to ensure that the flour hydrates properly.
-
Leave the dough in the mixing bowl and cover with plastic wrap. Let the dough rise for 1-2 hours, until double in size. Rising time will depend on the temperature of the room -- if it's cold, it will take longer to rise. If it's warm, the rising time will be shorter.
-
Chill the dough for 4-6 hours, or overnight. This will help develop flavor but will also help you work with the dough as it will be very wet.
-
Line a baking sheet with parchment paper. Sprinkle some flour on the centre of the sheet when the loaf will go.
-
Once your dough has chilled, fold in the cheese, olives, and herbs. The dough will be extremely sticky.
-
Using an oiled spatula (this helps prevent the dough from sticking), shape the dough into a ball in the bowl. Gently plop it onto the centre of the baking sheet where you have sprinkled some flour.
-
Wet your hands well and gently shape the dough into a ball. You must wet your hands or the dough will stick.
-
Cover loosely with plastic wrap and let rise for 30-45 minutes. It won't double in size this time around.
-
Preheat the oven to 450 degreed Farenheit with one rack in the middle and one on the bottom. Place a small roasting pan (or somthing similar) to the bottom rack. When you put the bread in the oven, you'll pour hot water into the pan to create steam. You want the oven to be very hot and at temperature, so I like to have it running a good 30 minutes before I plan to put the bread in the oven.
-
Remove the plastic wrap and sprinkle the top of the loaf with flour (not necessary, but makes it look more artisinal!) Have 1 cup of hot taper water ready to use when you place the dough in the oven.
-
Place the baking sheet on the middle rack and quickly pour the hot water into the pan on the bottom rack. Close the oven door quickly. This technique creates steam which helps the bread rise and also get a nice crust.
-
Bake the loaf for approximately 35-40 minutes, it will be a deep dark brown.
-
Once the loaf has cooled slightly, remove it from the baking sheet and place on a cooling rack. Let the loaf cool COMPLETELY before cutting into it. If you cut it too early, the texture will not be as good.
-
After you have cut into the bread, store it in a paper or plastic bag. If using a plastic bag, do not seal it completly. You can also loosely wrap it in plastic wrap. It is best if eaten within 2 days, but I've kept it longer and it holds it's texture pretty well.
*I worked a long time to create a perfect flour blend and this recipe was designed specifically to work with this blend. I have not tried this recipe with other blends and cannot guarantee you will achieve the same results. There are sooo many gluten free flour blends out there and they are all so different. I highly recommend using my blend, linked above and in the post.
**My mom has successfully used a food processor. You could also do this by hand but it will take a while!